公司有个项目 类似于组态 但是网上的框架 样式不符合我们的需求 要么就是收费 不开源 于是 !!!
我直接埋头苦干使用 Vue 纯Js 实现一个管道框架,用于管理管道、阀门和流动。该框架可以用于管道系统的模拟、管理和控制。
一、框架结构
该框架包含以下主要组件:
- 阀门(Valve): 用于控制管道流动的开关。
- 管道(Pipe): 用于连接不同的阀门,构成管道系统。
- 流动(Flow): 代表流体在管道中的运动。
二. 数据结构
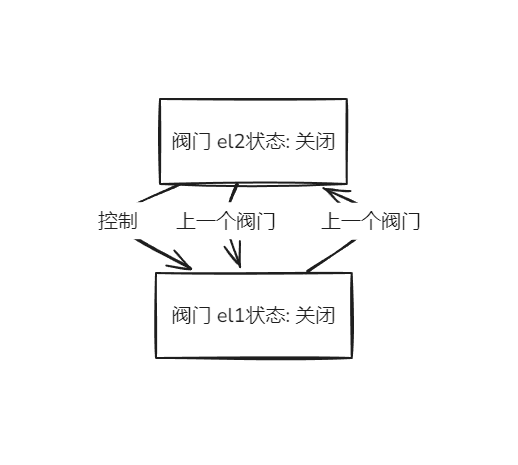
这段json中包含了一些阀门 key(例如 el1, el2, el3 等) 后面的数字则是标签的id 阀门包含一些阀门与阀门关联关系和绑定的管道信息。
// 阀门和管道的配置信息
export default {
    "el2": {
        // 阀门状态,true表示打开,false表示关闭
        "checked": false,
        // 下一个管道ID的数组
        "nextPipe": [],
        // 下一个阀门ID的数组
        "nextValve": ['el1'],
        // 上一个阀门ID的数组
        "lastValve": []
    },
    // 其他阀门和管道的配置信息...
}
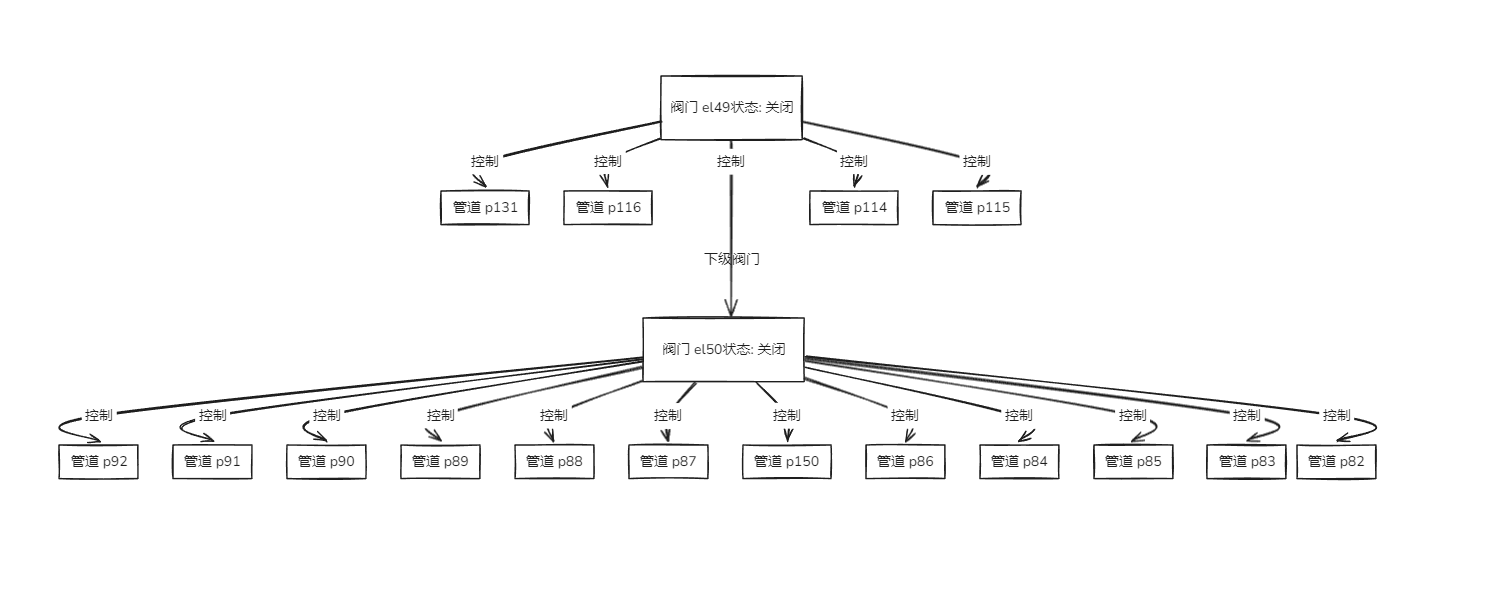
图式:

   "el49": {
        "checked": false,
        "nextPipe": ['p131', 'p116','p127', 'p114','p115'],
        "nextValve": ["el50"],
        "lastValve": []
    },
    "el50": {
        "checked": false,
        "nextPipe": [ 'p92','p91','p90','p89','p88','p87','p150','p86','p84','p85','p83','p82'],
        "nextValve": [],
        "lastValve": ["el49"]
    }
}
图式:
每个阀门都有一些属性,例如 checked 属性表示当前阀门是否被打开,这样的设计很好地描述了阀门的状态,是否允许液体流动。
在管道系统中,阀门的打开与关闭决定了流量是否可以流经该阀门。因此,通过控制 checked 属性,你可以有效地控制流量在管道系统中的流动。,nextPipe 表示下一个管道的名称,nextValve 表示下一个阀门的名称,lastValve 表示上一个阀门的名称,previousFlow 表示先前的流程信息。
这样的数据结构很好的描述了一个复杂的管道系统,其中不同的元素通过管道相互连接
三、模块功能
- 管道配置初始化(init): 初始化阀门状态和管道配置信息。
- 更新UI(updateUI): 根据阀门状态和管道配置更新用户界面。
- 获取上游阀门状态(getLastIsFlow): 递归获取上游阀门的状态,判断是否可以流动。
四、方法说明
initx(): 初始化阀门状态和管道配置信息。
updateUI(): 更新阀门和管道的UI显示。
getLastIsFlow(): 获取上游阀门的状态,判断是否可以流动。
isClose() : 处理多个阀门共同绑定相同的管道时 导致的后者阀门才生效的问题
核心代码结构:
// 示例代码 (核心代码放后面 这里粗略过一眼)
export default {
  data() {
    return {
      // 阀门工厂配置信息
      valveFactory: {
        "el2": {
          "checked": false,
          "nextPipe": [],
          "nextValve": ['el1'],
          "lastValve": []
        },
        // 其他阀门配置信息...
      }
    }
  },
  methods: {
    // 阀门管道初始化
    initx() {
      // 初始化代码...
    },
    // 更新UI
    updateUI() {
      // 更新UI代码...
    },
    // 获取上游阀门状态
    getLastIsFlow(item, valveFactory, res) {
      // 获取上游阀门状态代码...
    },
    isClose(...) {

    }
  }
}
hongGeng.vue
渲染层
// 画布的一些初始化配置信息
export default {
      Width: 5000,
      Height: 5000,
      hleft: -1550,
      htop: -2000,
      Press: false,
      displacement: {
        scale: 1,
        zoom: this.Zoom
      },
      getPointArr: [0, 0],
      init: null,
      inTagList: {}
    }
  }
这段代码是画布的一些初始化配置信息,其中包括了画布的宽度(Width)、高度(Height)、水平偏移量(hleft)、垂直偏移量(htop)、
按下状态(Press)、位移信息(displacement)、
获取点数组(getPointArr)、初始化函数(init)以及标签列表(inTagList)等。
具体来说:
- Width 和 Height 分别表示了画布的宽度和高度。
- hleft 和 htop 分别表示了画布相对于某个原点的水平和垂直偏移量。
- Press 表示画布是否处于按下状态。
- displacement 对象包含了位移的相关信息,包括比例尺(scale)和缩放比例(zoom)。
- getPointArr 是一个获取点数组。
- init 是一个初始化函数,可能用于初始化画布。
- inTagList 是一个标签列表对象。
 /*
    * 初始化配置
    * 初始化样式
    * 仅仅加载pipeSet配置
    * 详细 请看 pipe.vue -> props
    * */
    initx() {
      let pipeSet = this.pipeSet
      let valveFactory = this.$parent.valveFactory || {}
      let allValve = [], allPipe = [], allPump = [], handPump = []
      // 初始化阀门状态
      for (let i in this.$children) {
        let row = this.$children[i]
        if (row.$el.className === 'hgValve') {
          row.rotatex = row.rotate
          allValve.push(row)
        } else if (row.$el.localName === 'svg') {
          // 存在层级的值
          if (row.ZIndex) {
            row.zindex = row.ZIndex
          }
          allPipe.push(row)
        } else if (row.$el.className === 'pumpBox') {
          allPump.push(row)
        } else if (row.$el.className === 'handPump') {
          allPump.push(row)
        }
        let e = row.$el
        if (['hgValve', 'pumpBox', 'hgDevSwitch', 'hgSwitch', 'handPump'].includes(e.className)) {
          let id = e.id
          if (!id) continue
          if (!valveFactory[id]) continue
          row.checked = valveFactory[id].checked
          if (row.checked) {
            this.updateUI(valveFactory)
          }
        }
      }

      // 统计 阀门 管道 泵 DOM
      let inTagList = {
        'allValve': allValve,
        'allPipe': allPipe,
        'allPump': allPump,
        'allHandPump': handPump
      }
      this.inTagList = inTagList
      // 初始化配置
      let list = inTagList.allPipe
      for (let i in list) {
        let PlayTheAnim = pipeSet.PlayTheAnim
        let BackgroundColor = pipeSet.BackgroundColor || null
        let StrokeLinecap = pipeSet.StrokeLinecap || 'square'
        let StrokeWidth = pipeSet.StrokeWidth || 5
        let StrokeDasharray = pipeSet.StrokeDasharray || 20
        let LineColor = pipeSet.LineColor || null
        let AnimVelocity = pipeSet.AnimVelocity || 2
        let Direction = pipeSet.Direction || false
        let HideStaticPipe = pipeSet.HideStaticPipe || false
        let HideArrowhead = pipeSet.HideArrowhead
        // let HideArrowhead = true
        if (list[i].Custom) {

          if (list[i].BackgroundColor) {
            BackgroundColor = list[i].BackgroundColor
          }

          if (list[i].StrokeWidth) {
            StrokeWidth = list[i].StrokeWidth
          }

          // if (list[i].StrokeLinecap) {
          //   StrokeLinecap = list[i].StrokeLinecap
          // }


          if (list[i].HideArrowhead !== undefined) {
            HideArrowhead = list[i].HideArrowhead
          }
          if (list[i].StrokeDasharray) {
            StrokeDasharray = list[i].StrokeDasharray
          }
          if (list[i].LineColor) {
            LineColor = list[i].LineColor
          }
          if (list[i].AnimVelocity) {
            AnimVelocity = list[i].AnimVelocity
          }
          // 默认会显示 所以先注释掉
          if (list[i].HideStaticPipe !== undefined) {
            HideStaticPipe = list[i].HideStaticPipe
          }

          // 处理 开启动画后是否显示流动效果
          if (list[i].PlayTheAnim !== undefined) {
            PlayTheAnim = list[i].PlayTheAnim
            HideStaticPipe = false
            // 处理 关闭动画后是否显示流动效果
            if (!PlayTheAnim) {
              if (list[i].HideStaticPipe !== undefined) {
                HideStaticPipe = list[i].HideStaticPipe
              }
            }
          }
          if (list[i].Direction !== undefined || list[i].Direction !== null) {
            Direction = list[i].Direction
          }
        }
        // 开启全部动画配置
        if (this.Press) {
          list[i].playTheAnim = false
        } else if (PlayTheAnim !== undefined) {
          list[i].playTheAnim = PlayTheAnim
        }


        list[i].direction = Direction
        list[i].hideArrowhead = HideArrowhead
        list[i].strokeLinecap = StrokeLinecap
        list[i].strokeWidth = StrokeWidth
        list[i].strokeDasharray = StrokeDasharray
        if (AnimVelocity === null || AnimVelocity === undefined) {
          AnimVelocity = 2
        }
        list[i].animVelocity = AnimVelocity
        list[i].lineColor = LineColor
        list[i].hideStaticPipe = HideStaticPipe
        if (BackgroundColor) {
          list[i].backgroundColor = BackgroundColor
        }
        if (this.pipeSet.PlayTheAnim) {
          list[i].playTheAnim = true
          list[i].hideStaticPipe = false
        }
      }
      console.debug(this.$parent.$options.name + ' load success!')
    }
以上代码
初始化各种元素数组:
- allValve 存储所有阀门元素。
- allPipe 存储所有管道元素。
- allPump 存储所有泵元素。
- handPump 存储所有手动泵元素。
遍历子元素进行初始化:
- 通过遍历子元素(this.$children),将阀门、管道、泵等元素分类,并初始化它们的相关状态,例如旋转角度、层级等。 统计标签列表:
- 创建一个包含各种元素的标签列表对象 inTagList,其中包括了阀门、管道、泵等不同类型的元素数组。 初始化管道配置:
- 从配置信息 pipeSet 中获取一系列管道的外观配置,例如动画状态、背景颜色、线条宽度、线条样式、颜色等等。
遍历所有管道元素,根据每个管道的个性化配置(如果有)来覆盖全局配置。 处理特殊情况: - 处理开启或关闭动画后是否显示流动效果(PlayTheAnim 和 HideStaticPipe)。
处理是否隐藏箭头(HideArrowhead)。
更新UI:
- 通过调用 updateUI 方法,根据阀门工厂的状态更新UI。 其他处理:
- 设置一些额外的配置,如动画速度、方向等。
函数解析
(深度递归)
 /*
    *  时间复杂度O(n!)
    * ps: 当遇到 [Vue warn]: Error in v-on handler: "RangeError: Maximum call stack size exceeded" 时
    * 该异常为死循环 会抛出此异常
    * 请检查lastValve 是不是和当前的key重复了
    * */
    getLastIsFlow(item, valveFactory, res) {
      if (item.lastValve.length === 0 || !item.lastValve) return true
      // let isres = false
      // 查找 当前阀门的上面是否有被打开
      for (let k in item.lastValve) {
        let row = valveFactory[item.lastValve[k]]
        if (!row) {
          console.warn('未声明 #id: ' + item.lastValve[k])
          continue
        }
        if (row.checked) {
          // 解决 流动 指向多个同级阀门后者阀门导致管道流动异常停止流动的问题 2024 01 19
          // return this.getLastIsFlow(valveFactory[item.lastValve[k]], valveFactory, res)
          res = this.getLastIsFlow(valveFactory[item.lastValve[k]], valveFactory, res)
          // 如果上一个阀门打开就直接结束循环
          if (res === true) {
            return true
          }
        }
      }
      return res
    },
这段代码是一个递归函数,用于检查当前阀门的上游阀门是否有打开的阀门
- getLastIsFlow 函数接收三个参数:
- item:当前阀门对象。
- valveFactory:阀门工厂对象,存储了所有阀门对象。
- res:初始值为 true,用于存储递归调用的结果。
该函数的作用是检查当前阀门的上游阀门(即 lastValve 属性中指定的阀门)是否有被打开的阀门。如果有,那么当前阀门绑定的管道也应该流动
- 函数首先检查 lastValve 是否为空或未定义,如果是则是根节点的fa'm,则直接返回 true
然后遍历当前阀门的所有上游阀门,对每一个上游阀门进行如下查找:
- 如果上游阀门未定义(可能由于配置错误或缺失),则在控制台输出警告信息(id未定义),并继续下一个上游阀门的检查。
- 如果上游阀门被打开(checked 属性为 true),则递归调用 getLastIsFlow 函数,传入上游阀门对象和 valveFactory 对象,并更新 res 的值为递归调用的结果。
- 如果递归调用的结果为 true,则表示上游阀门中有被打开的阀门,当前阀门也应该被打开,于是函数返回 true。
如果遍历完所有上游阀门后都没有发现被打开的阀门,则返回 res,表示当前阀门是否应该被打开的结果。
总体来说,该函数的作用是检查当前阀门的上游阀门中是否有被打开的阀门,以确定当前阀门是否应该被打开。
那么 说到递归 时间复杂度是?
该段函数 经过了大多重写 优化 这段代码的时间复杂度取决于阀门之间的关系和阀门数量。由于函数中存在递归调用,需要考虑到递归调用的次数。
假设有 n 个阀门,且它们之间的关系形成一个树结构,其中每个阀门都只有一个父阀门(即只有一个阀门指向当前阀门),并且最终的递归调用路径为一条直线。
在这种情况下,每个阀门的 getLastIsFlow 函数最多会被调用一次,所以总的时间复杂度为 O(n)。
然而,如果阀门之间存在复杂的循环或者多个父阀门指向同一个阀门的情况,递归调用的次数可能会增加,导致时间复杂度变高。
总的来说,这段代码的时间复杂度在最坏情况下可能达到 O(n),其中 n 是阀门的数量
    // 防止共同阀门导致最后一个阀门才能控制对应管道
    isClose(id, valveFactory) {
      return Object.values(valveFactory).some(valve => {
        if (valve.nextPipe.includes(id) && valve.checked) {
          return this.getLastIsFlow(valve, valveFactory, false);
        }
        return false;
      });
    },
// 更新阀门与管道数据发生后的变化
updateUI() {
// 属性克隆
const valveFactory = {...this.$parent.valveFactory};
// 配置 动画为关闭
if (this.pipeSet.PlayTheAnim) {
return;
}
this.$nextTick(() => {
Object.values(valveFactory).forEach(valve => {
const lastOpen = this.getLastIsFlow(valve, valveFactory, false);
const nextPipe = valve.nextPipe;
if (valve.checked && lastOpen && nextPipe) {
nextPipe.forEach(id => this.editPipeAnim(id, true, null));
} else if (nextPipe) {
nextPipe.forEach(id => this.editPipeAnim(id, false, valveFactory));
}
});
});
},
// 改变管道动画 pid 为管道id
editPipeAnim(pid, playTheAnim, valveFactory) {
const allPipe = this.getComponent.allPipe;
// 获取dom实例
const pipe = allPipe.find(pipe => pipe.$attrs.id === pid);
if (!pipe) return;
if (valveFactory && this.isClose(pid, valveFactory)) return;
pipe.playTheAnim = playTheAnim;
pipe.direction = pipe.Direction;
pipe.zindex = pipe.ZIndex === undefined || (playTheAnim ? 100 : 0);
if (playTheAnim && this.pipeSet.HideStaticPipe) {
pipe.hideStaticPipe = false;
} else if (!playTheAnim && pipe.custom) {
pipe.hideStaticPipe = pipe.HideStaticPipe;
} else {
pipe.hideStaticPipe = this.pipeSet.HideStaticPipe;
}
},
这段代码包含了两个方法:updateUI 和 editPipeAnim,它们都涉及到了更新阀门与管道数据后的变化。
updateUI 方法:
- 首先对阀门工厂进行属性克隆,以确保不直接修改原始数据。
- 如果 Teacher 属性或 PlayTheAnim 属性为真,表示不需要更新UI,则直接返回。
- 使用 $nextTick 方法,在下一次 DOM 更新周期执行以下操作:
- 遍历阀门工厂中的所有阀门。
- 对于每个阀门,检查其是否应该被打开,并获取其下一级管道的 ID。
- 如果阀门被打开且其上游阀门也被打开,并且存在下一级管道,则将这些管道设置为播放动画状态。否则,将这些管道设置为停止播放动画状态。
editPipeAnim 方法:
- 接收参数 pid(管道ID)、playTheAnim(播放动画状态)、valveFactory(阀门工厂对象)。
- 通过 this.getComponent.allPipe 获取所有管道的实例。
- 根据 pid 查找对应的管道实例。
- 如果未找到管道实例,则返回。
- 如果 valveFactory 存在,并且指定的阀门关闭,则返回。
- 根据 playTheAnim 设置管道的 playTheAnim 属性,用于控制播放动画状态。
- 根据管道的 custom 属性和 HideStaticPipe 属性设置管道的 hideStaticPipe 属性。
- 根据管道的 ZIndex 属性设置管道的 zindex 属性。
这段代码主要用于在更新阀门与管道数据后,根据新的状态更新UI,包括管道的动画播放状态、层级、静态管道显示状态等。
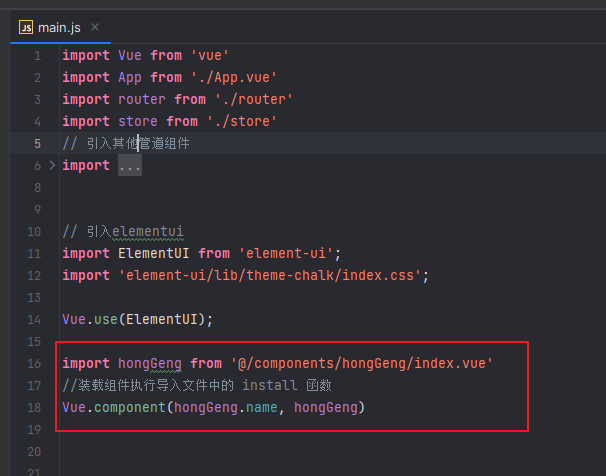
最后该组件会被挂载到全局使用

<template>
    <hongGeng
        ref="hongGeng"
        :Zoom="1"
        :pipeSet="pipeSet"
        :Factory="valveFactory"
        @change="handlerClick">
    </hongGeng>
</template>
<script>
tips 为什么要进行属性克隆,不直接修改原始数据?
- 属性克隆是一种常见的做法,特别是在涉及到原始数据的修改时。主要原因有以下几点:
- 避免直接修改原始数据: 在编程中,直接修改原始数据可能导致意外的副作用,特别是在多处引用同一数据时。通过属性克隆,可以确保对克隆对象的修改不会影响到原始数据,从而降低出错的可能性。
- 保留原始数据的完整性: 属性克隆会生成一个新的对象,这样可以保留原始数据的完整性,即使在后续的操作中对克隆对象进行了修改,也不会影响到原始数据的结构和内容。
- 可控制性: 克隆后的对象可以根据需求进行修改和处理,而不会影响到其他地方对同一数据的使用。这样就可以更灵活地控制数据的操作和状态。
- 更易于调试和维护: 克隆后的对象与原始数据相互独立,使得在调试和维护过程中更容易定位和理解代码的行为,降低了代码的复杂度。
顺便说一嘴 属性克隆是一种良好的编程实践,可以提高代码的健壮性、可维护性和可读性,避免潜在的错误和不良影响。
演示
hgpipeDemo2.mp4
8 条评论
有几个问题想请教下,这个图我看应该是svg,是手动绘制的吗,阀门的上下游管道是怎么维护的呢
具体可以看右侧目录 核心代码实例 有段 valveFactory 阀门工厂数据
阀门工厂配置信息 el1 这个key作为某个阀门的id (也是一个div 的#id)
从这个json对象其实可以看出 nextPipe 数组存储着管道的id (svg 的id 具体实现则会遍历这个数组 直接获取dom节点 然会修改相应的样式 或动画)
lastValve nextValve存储的都是阀门 比如 nextValve: ['el2', 'el3'] 表示 el 阀门下 有 el2 和el3 的阀门.
lastValve 同理 只不过他存的是el1 前面有哪些阀门
还有就是我加你qq了,可以交流下,佬一直没回复捏
我看了下,我主要想知道netxPipe这样的信息是手动录入的吗还是有个编辑页面生成的,如果编辑页的话,那逻辑就比较麻烦了
也可以使用js 动态的修改逻辑
那当然是编辑页面生成的 不需要手动去修改代码
编辑页面的连线是那种拖拽元素然后连线还是别的啊,如果是拖拽的话是纯原生写的吗还是用了一些库啥的
s1FasfS